Difference between revisions of "Keycatrich Trench (Menace)"
| Line 1: | Line 1: | ||
[[Keycatrich Trench (Menace)]] is a Level 55 [[Menace Dungeon]] locked behind the vault in [[Keycatrich Trench]]. | [[Keycatrich Trench (Menace)]] is a Level 55 [[Menace Dungeon]] locked behind the vault in [[Keycatrich Trench]]. | ||
| + | |||
| + | <includeonly>=</includeonly>==Guide==<includeonly>=</includeonly> | ||
| + | I learned that there are three four-way rooms in this dungeon. Every time you enter one of these rooms, you are always in the bottom-left corner (as viewed from above). The rooms which dead-end with treasure will always let you go back up to the four-way room. So, without further delay, here's the data you've been waiting for. | ||
| + | |||
| + | The first room is on the 6th floor, and breaks out as follows: - Top-Left: Continue Deeper Into The Dungeon - Top-Right: Dead-end after two floors, yields [[Emerald Bracelet]] - Bottom-Right: Dead-end after two floors, yields [[Dominator]]. | ||
| + | |||
| + | The second room is on the 12th floor, and breaks out as follows: - Top-Left: Dead-end after two floors, yields [[Wizard Shied]] - Top-Right: Continue Deeper Into The Dungeon - Bottom-Right: Dead-end after two floors, yields [[Splendid Building Stone]]. | ||
| + | |||
| + | The third and final room is on the 15th floor, and breaks out as follows: - Top-Left: Dead-end after two floors, yields [[Circlet]] - Top-Right: Continue Deeper Into The Dungeon to the Boss - Bottom-Right: Dead-end after two floors, yields [[Diamond Bracelet]]. | ||
<includeonly>=</includeonly>==Treasures on Each Floor==<includeonly>=</includeonly> | <includeonly>=</includeonly>==Treasures on Each Floor==<includeonly>=</includeonly> | ||
| Line 53: | Line 62: | ||
In regards to floors with branching paths the directions left, right, straight refer to when your back is to the entrance you entered from | In regards to floors with branching paths the directions left, right, straight refer to when your back is to the entrance you entered from | ||
| − | |||
| − | |||
| − | |||
| − | |||
| − | |||
| − | |||
| − | |||
| − | |||
| − | |||
<includeonly>=</includeonly>==Map==<includeonly>=</includeonly> | <includeonly>=</includeonly>==Map==<includeonly>=</includeonly> | ||
{{see also|Keycatrich Trench (Menace) Map}} | {{see also|Keycatrich Trench (Menace) Map}} | ||
{{:Keycatrich Trench (Menace) Map}}[[Category:Dungeons]] | {{:Keycatrich Trench (Menace) Map}}[[Category:Dungeons]] | ||
Revision as of 08:15, 27 February 2017
Keycatrich Trench (Menace) is a Level 55 Menace Dungeon locked behind the vault in Keycatrich Trench.
Guide
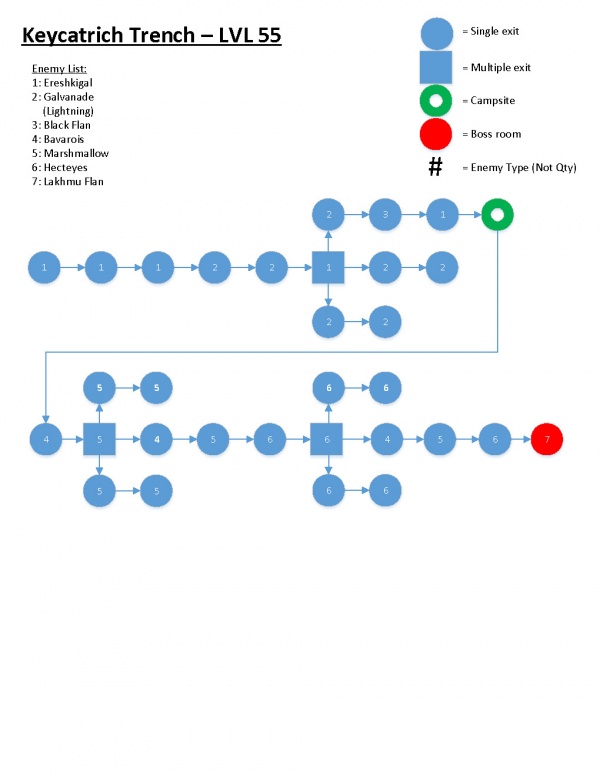
I learned that there are three four-way rooms in this dungeon. Every time you enter one of these rooms, you are always in the bottom-left corner (as viewed from above). The rooms which dead-end with treasure will always let you go back up to the four-way room. So, without further delay, here's the data you've been waiting for.
The first room is on the 6th floor, and breaks out as follows: - Top-Left: Continue Deeper Into The Dungeon - Top-Right: Dead-end after two floors, yields Emerald Bracelet - Bottom-Right: Dead-end after two floors, yields Dominator.
The second room is on the 12th floor, and breaks out as follows: - Top-Left: Dead-end after two floors, yields Wizard Shied - Top-Right: Continue Deeper Into The Dungeon - Bottom-Right: Dead-end after two floors, yields Splendid Building Stone.
The third and final room is on the 15th floor, and breaks out as follows: - Top-Left: Dead-end after two floors, yields Circlet - Top-Right: Continue Deeper Into The Dungeon to the Boss - Bottom-Right: Dead-end after two floors, yields Diamond Bracelet.
Treasures on Each Floor
| Floor | Left | Right | Straight |
|---|---|---|---|
| 1 | Elixir | ||
| 2 | Hi-Potion | ||
| 3 | Laser Sensor | ||
| 4 | Circlet | ||
| 5 | Shattered Timepiece | ||
| 6 Branching Path |
Quality Building Stone | ||
| 7 | Splendid Building Stone | Mythril Shaft | Debased Coin |
| 8 | Gold Bangle | Emerald Bracelet* | Oracle Ascension Coin |
| 9 | Rune Earring* | ||
| 10 Camp |
Dominator | ||
| 11 | Hi-Potion | ||
| 12 Branching Path |
Laser Sensor | ||
| 13 | Hi-Potion | Earth Gemstone | Debased Coin |
| 14 | Debased Silverpiece | Gold Bangle* | Splendid Building Stone |
| 15 | Beautiful Bottle | ||
| 16 | Debased Coin | ||
| 17 | Sky Gemstone | Oracle Ascension Coin | Mythril Shaft |
| 18 | Wizard Shield | Prismatic Shard | Diamond Bracelet |
| 19 | Mega-Phoenix* | ||
| 20 Boss |
Hyper Magnum |
*Random Treasure
In regards to floors with branching paths the directions left, right, straight refer to when your back is to the entrance you entered from
Map
- See also: Keycatrich Trench (Menace) Map
