Balouve Mines
Balouve Mines is a Dungeon
Contents
Strategy Guide
There are a number of dungeons in the game, some of which should be tackled only once you’ve reached the end-game. The Balouve Mines is one of those dungeons that should be attempted towards the end of the game – just be aware that the only real challenge when it comes to this dungeon is the final boss that crops up to make your life that much more difficult.
Throughout your entire time inside this dungeon, you are bound to come across a number of low-level goblins, of which should not take even a second to defeat. One quick slice at them with any weapon-type should kill them without question; so expect to be dealing with these guys until you reach the very end of the dungeon.
Upon entering the dungeon you will come across a lift that you’ll want to step inside and as it lowers further and further down into the mine, you can take your pick of when you want to step off. Despite being able to step off the elevator whenever you see fit, the items spread about on each floor aren’t anything too special, but you can’t really complain about some free items every now and again, now, can you?
When you’re ready to continue progressing through the mine, take the lift to the second basement floor and then head north. Keep an eye out for a bridge that you’re going to want to cross and prepare yourself for a very brief, but surprising event that can make you jump if you aren’t quite expecting it. Once you get halfway across the bridge you will be attacked by the boss of the dungeon – a fellow who is similar to the Ronin that you’ve fought earlier in the story – at which point he will stab you and push you down onto the lower level, underneath the bridge. Quickly heal up and dispatch whatever goblins that crop up to try and catch you off guard.
After you’re safe from the small horde of goblins, go back to the lift or take the staircase that’s shown on the mini-map to finally arrive just outside the area you’re going to fight the boss.
Looking down into the pit below your feet in this new area should reveal the boss of the dungeon to you.
Be aware: If you intend to take on this boss, make sure that you intend to defeat him, as he is one of the few bosses in the game you can’t escape from once you’ve started the fight. Trust me: I made this mistake early in the game and ended up having to face my defeat when I realised that there wasn’t an actual exit for me after I jumped down. On the upside, however, at any level over 50 you won’t have any trouble in the slightest dealing with him.
As stated before, the boss is a lot like the Ronin you will have faced a countless number of times by now; just a stronger, more powerful version. For this fight, basically keep on your toes, block or dodge their strikes every chance you get and before too long the fellow will be defeated; leaving you to claim your spoils.
After the boss has been felled, head north of the ladders and you should see a narrow passageway that you can fit into with ease. Follow that all the way around and before you know it, you will have gained access to the next Royal Arms: the Bow of the Clever; thus completing the dungeon.
Map
- See also: Balouve Mines Map
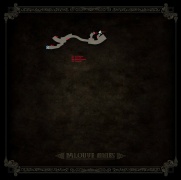
Floor 1
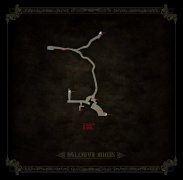
Floor 2
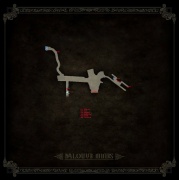
Floor 3
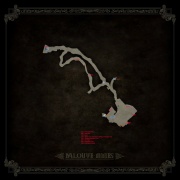
Floor 4
Floor 5


Balouve Mines (Lvl 78)
- See also: Balouve Mines (Menace)
Balouve Mines (Menace) is a Level 78 Menace Dungeon locked behind the vault in Balouve Mines.
Guide
Before you make a start on this particular quest, you’re going to want to make your way to the Balouve Mines first and foremost, as there’s where you’re going to find the entrance to this secret dungeon. Head to where you found the boss for this area and go up the stairs until you come to some ladders. From there you have two options: east and north. East will lead you to the Royal Tomb, but north will take you straight to the secret dungeon entrance where you can finally make a start on this relatively short and linear secret dungeon.
Be aware that the recommended level for this location is 78 and when you finally come across the end boss for the area, you’ll quickly understand why! Despite this, the enemies themselves aren’t all that bad and each and every single one of them has a different weapon weakness that you will quickly discover just by hacking away at them.
Similar to all of the other “A Menace Sleeps in” quests in the game, the general dungeon is really quite linear and is hard to get lost. While it may be the only one that elevates between levels, the map and overall exploration of the location simply points out where you need to go pretty much the entire time; with the exception of 2 large rooms and little else.
For both of these large rooms you’re going to want to take the left exit to continue your progress through this dungeon and head down another couple of levels – a good indication that you’re going in the right direction for this dungeon.
Before too long you will come up to the one and only campsite inside the entire dungeon and it might be an idea to get some rest before you move on. Located just around the campsite you will find the Apocalypse greatsword, a greatsword that is considered one of the best in the entire game, so I certainly wouldn’t recommend leaving it behind. After you leave the campsite, get ready for the boss fight for this dungeon and it will be up against a Pyromancer – that guy who is a big fan of fire.
Despite being the final boss of the dungeon, the Pyromancer only has two attacks that he’s going to use against you: a poisonous breath-attack and a triangle-beam attack that can petrify you if it lands on Noctis. He can also grab you if you’re too close to him and you’re going to be stuck in his grasp until one of your teammates manage to break you out of it. For this specific boss, you don’t need to worry too much about staying on the offensive, because you’re going to want to be more on the defensive for this guy; at least that way you won’t get caught off guard by some of his more damaging attacks.
After the boss drops dead to the floor, enjoy your brand new weapon that goes by the name of the Death Penalty – a weapon that’s considered the very best firearm in the game. From there, feel free to exit out of the dungeon because you are done here!
Treasures on Each Floor
| Floor | Left | Straight | Right |
|---|---|---|---|
| 1 | Chrome Bit | ||
| 2 | Hi-Elixir | ||
| 3 | Rusted Bit | ||
| 4 | Oracle Ascension Coin | ||
| 5 | Prismatic Ore | ||
| 6 | Mythril Shaft | ||
| 7 | Potion | ||
| 8 | Megalixir | ||
| 9 | Hi-Potion | ||
| 10 Camp |
Apocalypse | ||
| 11 | Earth Gemstone | ||
| 12 Branching Path |
Oracle Ascension Coin | ||
| 13 | Beautiful Bottle | Gold Ore | Silver Ore |
| 14 | Prismatic Shard | Emperor's Anklet* | Oracle Earring |
| 15 | Megalixir | ||
| 16 Branching Path |
Prismatic Ore | ||
| 17 | Hi-Elixir* | Hi-Potion | Prismatic Dust |
| 18 | Mega-Potion | Platinum Ingot | Platinum Bangle* |
| 19 | Ether | ||
| 20 Boss |
Death Penalty |
*Random Treasure
In regards to floors with branching paths the directions left, right, straight refer to when your back is to the entrance you entered from
Map
- See also: Balouve Mines (Menace) Map
